


99GTB
-
Posts
437 -
Joined
Content Type
Profiles
Forums
Events
Store
Posts posted by 99GTB
-
-
Might have to pull the whole headliner out and have a look :-\
 DON'T DO THAT!!
lol well you could, but just make sure you put it back on when you're done, unlike me lol been years without a complete interior, boot lining and headliner still missing.
Probably won't help much though, you could try putting a little weight on it as you push the button.
-
No there is one rocker switch. The front one should tilt up first and then the rear one should slide back, the rear one will pull back the blind as it opens. And the reverse happens when you close it.
I'm pretty sure you release the button after the front one has opened and press the button again to initiate the back one opening.
It has been awhile since I've used mine as I sealed it up because it self destructed and leaked.
-
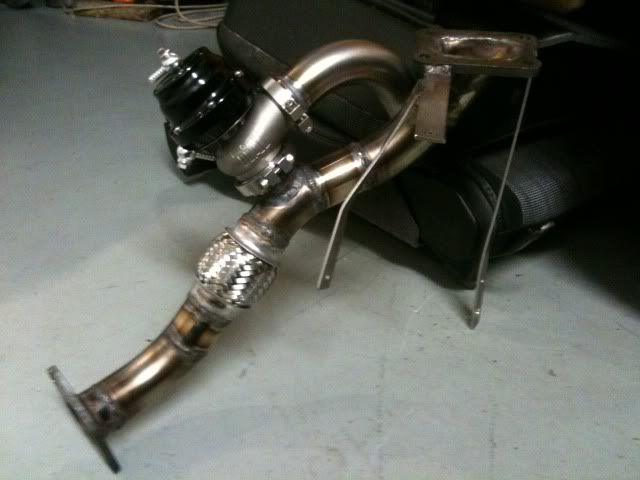
Yea the pipe clears the bonnet, it's a 2.5" pipe and has been dented underneath slightly where it goes over the manifold for extra clearance.
-
true ers for that that actually helps quite a bit . now i just have to remove all these hoses that are in they way and figure out what some of this s*** is haha.but yea that looks very doable. wanna sell your setup =P
Um no sorry won't sell it, just built it recently and haven't even got to drive it yet. (everything is for sale for the right price, but in this case that price is very high lol)
I did very similar to koom to build, had a flange and made some brackets to hold the flange in place first and then built the piping to suit.
Here's another pic I have of the brackets...
And this is why i wouldn't really want to sell it anytime soon...

Rather custom setup, all the work was done by myself and jason (gotasuby) + a welder.
-
This is how mine is held and I probably have one of the heaviest turbos on here lol (20kg+)
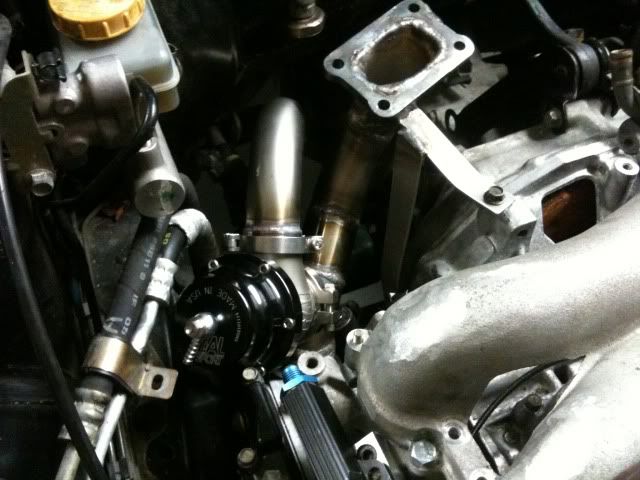
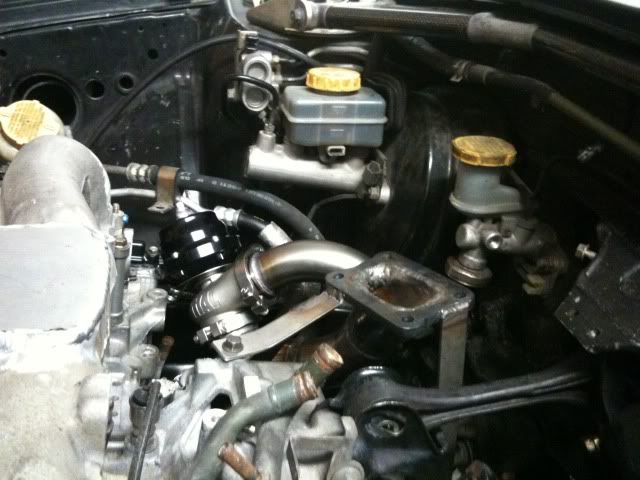
Flexi joins in the up and down pipe.
Basically just need something like flat bar welded to the flange / uppipe / downpipe and bolted to engine or gearbox. (not bolted to anything firmly attached to the body because the engine moves quite a bit)
-
Link storm wire in, tune, single turbo exhaust manifold, turbo, intercooler ypipe, intake pipe, exhaust downpipe. (probably missed the odd little thing)
Main cost would be ecu and tune, ~$3000 all up maybe, If you do it yourself/with the help of someone that knows what they're doing.
Not worth changing complete engine.
-
No pics of engine, has an ecu and dash, that seems to be all.
-
Gotasuby is a terrible mechanic heard really bad stories about him I would beware dacerx
-
-
I do pretty much all my own work so have no one to blame but me lol. I try not to rip myself off.
-
The rev C has the non projector style indicators. So rev D should be any with facelift headlights, unless they have been swapped like my 1999 rev B GTB
-
Was wondering when you were going to post that link joker
-
Spent $215 getting fuel and oil lines and fittings out of customs for my GTB.
-
Cheers aim - better suspension done & dusted - certification pending.... :-)
As for track days.... I do have an interest.... just need to be dragged along to my first one, then i'll be sure to enjoy it and wanna go again some time. But will probably never get into it too seriously cos i don't wanna go down the weight reduction route - i like my nice heavy sub box, and the interior is one of the main attractions to the B4, and the reason i wanna keep it for a while - i've found most other newer cars interiors i've seen have that nasty cheap plastic look to them.... *do not want*.
But yeah I can't say i've ever felt brake fade on the road either. Have gotten things nice and hot stinky, but not actually experienced any fade. But hey, it's a cheap upgrade, and as you say the 4 pots can be made to look sweeeet.
I agree with you regarding not wanting to go down weight reduction route, I have gone for the much more power and 4pot, 2pot brembos route to compensate for the sound system and luxury. (requires rear brake adaptors to be machined up)
Rosco's seem alright priced and as previously mentioned 4 pots don't require cert and look good. When you have the spare cash I would get the calipers and some bendix ultimates pads (or similar) assuming your discs are in good nick and some good fluid. I know a few people who like the motul RBF600 fluid including myself. BNT are usually a good place to go for fluid, pads, rotors etc.
-
Your bahahas' go off the side of my 32" monitor lol
-
Yea the whole way through, didn't pay that much attention. Does a bit of a jolt just before the lawn mower sounds start lol.
-
You can see a little lawnmower wheel starting to appear in the picture near the end lol.
-
Cheers

Can't remember too well as it was a couple of years ago that I did it, but basically used a hammer to bend some of the metal out of the way that was preventing the lights from fitting in.
ie. if it didn't sit right I took it back out and used the hammer a little more.
-
Don't remember a metal knob, but there was some hammering done to make room to fit it.
Here's some pics...
I think the eyelids helped to keep the gap look like it wasn't there as they follow the bonnet lines, even though without them it was hardly noticeable. (might be because it was is a black car though)
At the moment the car is off the road but will have a brand new facelift bonnet, a facelift grill and the facelift bumper like the last 2 pics. I'm pretty sure there is no difference in the guards. Won't be any headlight cover or eyelids on the lights this time either.
-
I have done it!!!
It involved a bigger hammer.
-
I have lots and lots of photos of all the various bodykits I've come across over the years for BE/BH and the conclusion I have come to is subaru did a pretty damn good job, so most of my look is based on various factory parts mashed together.
-
I'm going to say no (just a hunch)
Advanti nitro 18x7.5 clear brembos fine, unsure of offset.
Twin spoke b4 17" wheels don't.
It can also depend on the spoke design though.
-
Quite possibly haha
-
I will take the gold 17s off you for no fees.
Yes they will be 5x100 and it depends on spoke design aswell, brembos can be quite picky sometimes.


-
Who's Online 0 Members, 0 Anonymous, 37 Guests (See full list)
- There are no registered users currently online
is it me or?
in Canterbury
Posted
Same here all messed up.