


Gripless
-
Posts
2,173 -
Joined
-
Last visited
-
Days Won
143
Content Type
Profiles
Forums
Events
Store
Everything posted by Gripless
-
5k in 2014 was normal rebuild price with just rings and bearings. there’s a good chunk of cost pulling and refitting motor that won’t be in forged build price. Just assembly would be 7k in labour. You can also waste time and cost measuring up and washing all the old parts on rebuilds. Most places will still strip the bottom end for inspection as you already know the valves hit the pistons. forged is 3k for rods and pistons which you can add to any build. For forged you also spending 7k more for the same power unless you plan on more power. Then you really want ported heads on the list so that adds $$$ What are you calling a crate motor? Even secondhand unchecked ones are 7k range
-
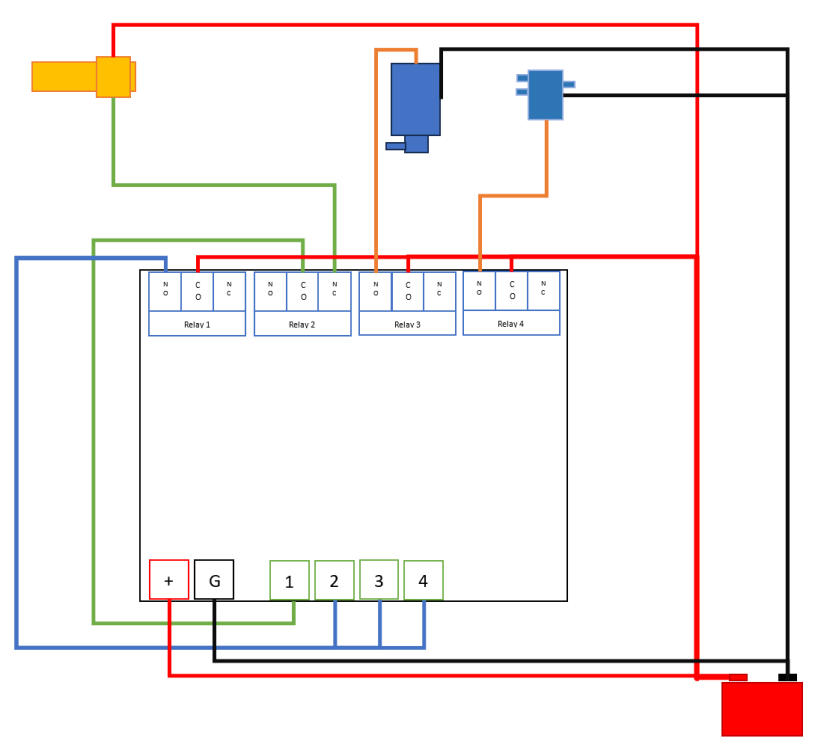
 This would work 3 fuses, and flasher relays do come in the same footprint as these common relays just dont need all 5 connections. They run 2-4 depending on type.
 -
MSword is slightly better than MSpaint Things in drawing are: Temperature switch, pump, solenoid. 4 Channel relay timer Battery Piping not shown I'd add: an indicator flasher relay between the solenoid and relay 4 NO connection for best efficiency and water savings. Also fuses should go between battery and relay common for relay 1,3,4 based on cable and device size. Heat-shrink and terminal fittings rather than bare wires etc Solenoid can either sit directly after pump and recirculate water back before pump or Sit between nozzles (or nozzle pairs if you run 4) so it alternates left/right or top/bottom for longer evaporation time
-
Pump depends on the jets you use: windscreen or headlight washers are lower pressure mist and irrigation are higher pressure Hose needs to fit and hold pressure of: pump nozzles Tee pieces one way valve. Needed for washer and high flow irrigation nozzles. Irrigation no drip while not one way do the same.
-
True cost is not low but no fab work is huge saving. My EFR is nearly twice the price it was 4 years ago. Does it fit LHD… no idea. Also not twin scroll so 2.5L only unless you want to swap back for rumble with isn’t uncommon.
-
Yes the basic one based on relays in that fuse box could be attached to a temp switch rather than a button. EDIT: Ok look at pretty diagram a few posts below for what this loooooog text looks like. or there are 4 relay timers that would stop the system running constantly until temp is low. https://www.aliexpress.com/item/4000273267216.html https://www.aliexpress.com/item/1005004681220191.html Idea would be to have temperature switch trigger relays eg connections Unit power to 12v and ground. temperature sensor connected to NC output of relay 2, and then relay 2 common to input 1 relay 1 NO output is connected to input 2,3,4 relay 3 NO output is pump relay 4 NO output is solenoid if you want that relay 1,3,4 common are 12v battery via fuse or fuses see below. Working Temp switch triggers input 1 and then that would trigger input2,3,4 relay 2 then disconnects input 1 since NC becomes open for a time so waits for water to have effect, otherwise it runs nonstop until temp drops. relay 3 runs pump relay 4 opens solenoid to allow water to jets or just does nothing. fuses Relay 1 only drives other relays, and relay 4 is solenoid so 3w. Pump is whatever wattage but likely higher than others. timers 1 just 1 second as just sets off others 2 time to wait before checking temp sensor again 3 pump run time should be shorter than timer 2 4 solenoid depending on how connected to pump or ignored. would be best to also add switch between temp switch (or unit power) to cabin so you can choose if the system is on or off. Just have to find a temperature switch in the range you want. They are common items for HVAC and for thermo fans in cars so plenty to choose from. just for anyone in future. Relays with 5 pins 2 pins are to coil that switches the below. NO is relay that tab that is normally and open circuit or disconnect until relay is active. NC is opposite to NO, so circuit is connected until relay triggered. Common is what NO and NC connect to. Can be 12v or ground or whatever you connect to it.
-
Very nice. Used plenty of windscreen washers in bumpers before but those save the pissing about with a needle/pin to rotate the jet up and almost closed. Even on lower lip their low profile still looks good so could run 4 if you wanted. Nothing stopping reusing the headlight popup nozzles either so they would lower from top down towards middle of intercooler.
-
-
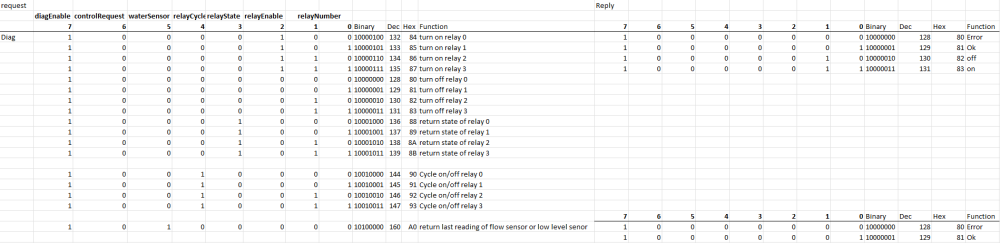
Needs more work, but initial syntax in single byte messages missing Startup code to announce IC spray unit is working and ready A way to return zone count Some operational error for water level and flow rate returned values (eg count over what time period, units to be converted to/from) possibly a few generic setup codes and hardware buttons. Way to set canbus ID externally but cant exactly have 11 switches to set it. send packet with configured ID when a button on the board pressed so you can see the ID in a capture. Requests codes -> possible replies Diagnostic codes start with 0 10###### External Hardware Used to test physical connections eg cycle would create audible clicking from a relay 11###### Internal ESP32 Hardware Mostly useless but can log if think there are issues Operational codes start with 0 00###### Manual triggered 01###### Automatic (must pass canbus ID for temp as next packet) Anyone feel free to copy this and build your own version for non commercial use.


-
Have worked out canbus code byte values. Only thing it needs to have hard coded is ID and the ID to listen for the intake air temp for auto mode. Auto to intake temp needs high and low byte as second byte would be target temp. Relay cycling has to be preset number or needs high and low bytes so can set default to 10. Since the idea is just to get it to click so you can tell if relay is dead. 4 relays can do Any 1 of 4 zones but spray is on/off by pump advatange is more zones, disadvantage spray comes on slow as pump builds pressure at start and drops at end so wastes a small amount of water each time. No delay between zone spray, just one after the other. or Any 1 of 3 zones and pulsed by solenoid that return water to tank or before pump until need. disadvantage less zones. Pump still runs full time. advantage build up and cut off are instant from solenoid so zero drip waste. Can program in more delay between zones so has longer evaporation time. More cooling less water. esp32 can have wifi updates to code so could be DIY setup even on car without access to usb or serial connector. Could preset the canbus ID to a default ID in a known range based on ecu like link, Emtron motec etc.
-
For those with canbus aftermarket ecu https://www.aliexpress.com/item/1005004213766448.html and any canbus module https://www.aliexpress.com/item/1005003450161614.html Or https://www.aliexpress.com/item/32757441080.html esp32 has canbus controller built in so only need the transceiver that does the physical connection. Arduino needs a controller like mcp2515 plus transceiver. Could be programmed for different operations modes. ecu sends time to run in seconds unit automatically runs cycles until time is up ecu sends on unit runs single cycle Ecu sends start and stop unit runs until stop received ecu send target intake temp unkt runs, then waits 3 second, requests temp, repeats until temp under target or stops after 10 cycles Ecu sends status request unit send running, idle, even water low if senor hooked up. Could be flow meter inline rather than water sensor in tank. If last run had no flow assume water low/empty. Diag options if unit is idle ecu can request relay # on for X seconds relay # cycle on of at x hz for x seconds Relay # current state. Use with above or should be off Water level low sensor current state Water flow meter current reading. Need to turn on or cycle relay for pump using above. CPU usage Memory usage CPU temp Board temp Even Wifi status if those are used. could run wifi AP with webpage showing connections and status of each part of unit and connected pump. canbus dumb version have to trigger each relay. More suited to meth or extra pump control etc. https://www.aliexpress.com/item/1005005510819149.html Alternative dumb single wire for button. You trigger input1 that runs 10 seconds triggers input2 input3 which run pump and solenoids in pattern as required. single press with can run a single cycle. input4 could run different or longer pattern. Or turn in intercooler fan when handbrake is on. https://www.aliexpress.com/item/4000273267216.html
-
https://www.trademe.co.nz/a/motors/car-parts-accessories/performance/electronics/listing/4258707187 option for tidy package. can get timer and flasher relays in standard relay size packages. fuse for pump, solenoids and input even water level sensor would all fit.
-
Yeah, but finding one is not easy and would have to swap throttle body and get new map sensor. throttlebody should be fine to use the 2.5 NA which is 70mm but same outer size. 7/8 map sensor isn’t on throttlebody so would need new sensor.
-
May have just enough space for turbo cover. Moving bracket holding up pipe 1-2mm outwards which should gain 2-3mm at top. Cutting off closest mount that is unused. Cutting height down on the bolt mount surface on TVG saves 3-4mm Using screw head not bolt head on same mount saves 3-4mm Thermal spacers are 8mm so can drop to 3mm ones, or even factory gaskets. Another 5-8mm All of which hopefully make up the 12.5mm radius increase. can also deform the silicone joiner a bit as turbo and manifold are bolted to block and won’t rub. Even if crushed in the anti surge airways are below the top point on turbo inlet. So much effort for tiny gain. Well maybe 30-40hp from cover swap.
-
Plan to paint top of rad now. have to pull it away from car to add foam sealing tape around it anyway.
-
All aftermarket manifolds are out… realised the top mount brackets all bolt up to manifold and nothing but stock will have them. Bolt that is in the way is only a TVG to upper manifold, not the main 4 that go onto the block. New cover also sits closer to compressor wheel as there is not vent to recirculate air so that helps.
-
Thanks. 3D printing I like that idea, they have that carbon fibre fibres stuff like my HANS device is made out of now too. Yeah red Sti joiner to intercooler was on the list but can the stock one hold 32psi. I tried to find the pink one last time and they had bright red only. Didnt think about painting rad top, thought had thought of air diverted plates.
- 85 replies
-
- 1
-

-
- engine build
- ej20
- (and 4 more)
-
One pump while makes ok pressure the pulsing can cause cavitation and if air builds up on spray side of pump it won’t pull in more from tank side. So that one is useless if the line if fatter than 2mm ID as then bubbles can collect at bends unless pump is lowest point.
-
Boost solenoid back on manifold wiring. Should go under stock mounting plate now. Stock airbox can go back in. Has resonator removed and cold air duct from spot light. Stock air feed from front also feeds cold air. Figured will cut a hole in it a cover with rubber flap. That way when cruising at speed and intakes are enough flap will stay closed and it’ll be pressurised a little. Though at low speed when launching the flap can open up to allow more airflow. Since it’s rubber no electronics needed the air pressure will open and close it as needed. Crinkle alloy with ceramic mat between OEM exhaust shield material will go on. Better than turbo beanie as can’t soak up oil or fluids. Have worked out heat panel for brake master and clutch master but turns out there are many designs of these even with same generations of Sti so can’t just make a heap of them. Other stupid ideas for more stock engine bay that may happen: Take top plate off or cut up OEM rad header tank and put it over the aftermarket one. Remove the yellow warning sticker from stock cap and stick over new cap. Cover turbo to airbox alloy pipe with heat wrap and then black plastic pipe. Rotate the intercooler to throttle silicone joiner around so writing doesn’t show. But really it ok as can’t hide the PW top mount, maybe remove huge PW wording from it would help. Could refit OEM turbo heat shield over compressor cover. Wanting a “If you know, you know” engine bay look. None of this hides the radium collection on the passengers side but there are loads of hoses and the battery cables over that side so it doesn’t stand out as much.Also massive shiny radiator sticks out a little. Had the wild idea of getting the stock intercooler and taking end tank off to fit a water to air core between them. Water hoses in/out on the passengers side That would then bolt up to the stock mounts and everything else like BOV etc. Then remembered I only have seam welded stock intercoolers as blew the tabs open on the original one and a brand new one. They don’t like 24psi too much.
-
The 2.5” original The 3.5” SXE inner is same 2.5” with the 0.5” surge all around it.
-
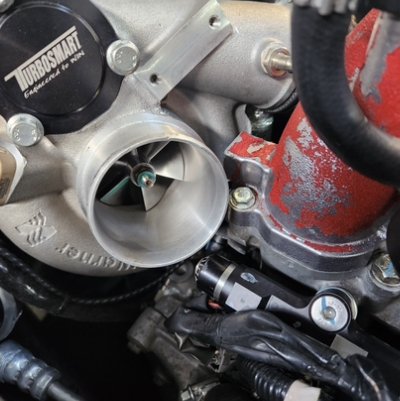
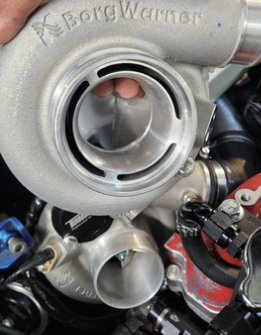
looking for in depth Subaru knowledge here… So I rushed and ordered a SXE compressor cover for the EFR before cert photos, and didn’t account for the 1” bigger inlet. Thought it was only 1/2” bigger. The turbo with stock efr cover is tucked up close to the manifold and TVG so the silicone pipe was 5mm from the random mounting standoff sticking out of stock manifold. a) The current manifold is stock Sti and TVG but all the insides have been ground smooth already. Also has 5mm thermal gaskets which could be removed. raduim split rail kit b) it’s the right lower in the photo. Big standoff and the TVG bolt. https://imgur.com/ukuy4aO c) needs to hold together at 32psi d) didnt want fancy intake etc and so avoiding that would be nice. Options I randomly thought up so far.. 1) PW 67mm TVG which lower the manifold 12mm from stock. Plus another 5mm of the thermal gasket is removed. https://processwest.com.au/product/133/PWTD04-Billet-TGV-Delete-Kit-suit-Subaru-01-07-WRX-STI-&-08-17-STI-Raw Looks like this isn’t enough 2) Anyone know of the older + spec one fits or flows well? https://forums.nasioc.com/forums/showthread.php?t=2722224 I remember something about GRB 2008+ manifolds having bigger internal runners. @Andy_Mac mentioned ethrottle mod needed as well. I have a old 2.5L NA 70mm ethrottle body that should match up. 3) cut the bolt and mount off and leave 5mm to and wire tie that edge. Hope and pray! 4) live with surge in midrange and resell compressor cover. Easy and cheap option rather than waste more money. 5) most aftermarket ones are out as they use the TVG still eg no cosworth, PW or most Chinese knockoffs. AMS may work but that near $2k just to get me and if not it then resell it. It may also be fatter that stock so potentially worse.
-
Measured boot and there is F all space in there. The spare tire limits middle to almost nothing. Chassis rails limit height to 60mm Biggest areas 60x150x330mm on each side. behind bumper is around 150x100x900mm 100mm is due to some bolts and the body seams higher up. so rear bumper tank could be workable.
-
Evos all had OEM sprayers so I never had my own, but rigged up plenty of washer pumps to garden 4mm plastic irrigation misters on gtir, vr4 and random Nissans. Evo is same as Sti near handbrake so you tap the button before downshift and passing. Don’t have a full list yet, but it’s just simple parts.. pumps anything high pressure 70-140psi are common and around $30 AEM water Meth just uses a diaphragm irrigation pump and similar nozzles as below. https://www.trademe.co.nz/a/motors/boats-marine/parts-accessories/pumps-tanks/listing/4233911838 For stand-alone just need something like the OEM one https://www.hella.co.nz/en/products/relays-flashers/time-control-relays/ there are adjustable versions from 0.2s upwards and you can put them in series to make patterns. Nozzles are just 6mm mist in a few sizes like https://www.aliexpress.com/item/1005004136903055.html can mount them in 6mm hole in the factory plastic under bonnet to intercooler duct. plus they claim the line as designed for high pressure. Likely run the hard black irrigation 6mm line for everything except the short bit between body and hood where more flexible clear line would be better. 3 port for nozzle select or turn to tank on normal full time pump https://www.aliexpress.com/item/1005005197895762.html Tanks turned out to be the expensive part. Have to pull boot apart and measure up size in there. Luckily my bumper is all chopped up so can just see the mounts so can measure all that tomorrow.
-
Hydroponics pipe look good. Thick walls and rated to hold water weight when horizontal. Flat surfaces so can drill and mount filler anywhere if you don’t get 20mm outlet end cap. Per meter 5L or 10L which should fit behind bumper. pipes 100x50mm or 100x100mm end caps blank or 20mm buy caps from China and pipe locally due to shipping.
-
Well that won’t work until get car back to PBMS. 4 port wired to MAF loom so stuck out that side of engine bay for now. MAF wire can be reused for water spray pattern solenoid. Have 2 TVG spare outputs, also maybe the front lower o2 sensor wires. Depending on what IO they are on ecu can run EGT to heads and another sensor as well. Engine pulls -0.85 bar vacuum on lift off, compared to -0.8 old motor with 30,000km. Same gauge, pipes and stock manifold. When done the engine bay other than radium and turbo will look pretty stock. Airbox and boost solenoid cover going back in. Need to find or reuse sticker from rad overflow top tank.


-
Who's Online 0 Members, 0 Anonymous, 84 Guests (See full list)
- There are no registered users currently online