Leaderboard


Popular Content
Showing content with the highest reputation on 29/04/18 in all areas
-
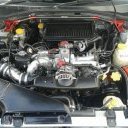
Installed cruise control! Love OEM option stuff. Bought the stalk and 4 pin brake switch from Sub Wrecks, definitely recommend these guys btw. I used a dremel to cut the hole in the rear steering wheel cover and installed. All plugs and wiring was already there. Literally plug and play for that part. Also, boost gauge! Sent from my SM-G930F using Tapatalk3 points
-
How do you find the MCA's?1 point
-
HALLELUJAH !! haha my prayer have been answered ! @Kenian1 point
-
For what it's worth, looked at all options the thread mentioned and went with MCA Super Streets.1 point
-
I'm tempted to weld up the spare viscous diff I have and try it, but I think i'd be getting some spare axles in case. at least if its welded and it snaps and axle it'll still drive... The supersix commodore/falcon race cars run welded diffs and don't seem to break too much related to that, but they are running a limited tyre size too. on a side note I thought I'd try chuck a suretrac diff in that i acquired a while ago but found they need equal length axle stubs and mine arnt. will keep a lookout for some axles incase i get motivated again.1 point
-
Changed my front wheel bearings today, here's a bit of a how to. I started by cracking the front wheel nuts and chocking the rear wheels. Jacked the front up, placed on axle stands and removed the front wheels. Then used a flat head screw driver to bend the locking tab on the axle nuts: Got a mate to hold the brake pedal down while I cracked both left and right side main 32mm axle nuts: Using a breaker bar on the axle nuts: Both front axle nuts removed, brakes released. I then removed the 2x17mm bolts holding the brake calliper to the hub. Pulled the calliper off the rotor and hung it with wire. This pic shows the 8mm bolt holes for removing a stuck rotor: Brake disc/rotor removed: Then removed the dust shield, 3x12mm bolts: ABS sensor removed and hung out of the way: Tie rod split pin and castle nut removed: I then refitted the nut upside down and used a block of wood, a sharp whack with a hammer and the tie rod end came out: Lower sway bar link removed: I then marked the location/rotation of the upper camber bolt, then loosened both nuts off: Then removed the ball joint housing bolt: Ball joint pulled out: I then removed the two loosened strut/camber bolts and pulled the hub housing off the axle, being careful not to damage the ABS tone wheel teeth: A close up of the F/L ABS tone wheel, (teeth the sensor works off): Both front hub housings removed, I went into town to where a handy 20 ton shop press lived: Axle hub pressed out of the hub housing: Axle hub pressed out, with the outside inner bearing still attached: I had no puller to remove the bearing, so fitted a gear spreader and used the press to get the bearing off: Outer bearing removed from axle hub: Inner oil seal removed with a claw hammer: I then used a flat head screw driver to remove the inner snap ring: Then pressed the outer bearing race out of the hub housing: Bearing race removed: Hub housing and axle hub cleaned up, ready for new bearings and seals to go in: There was nothing around the perfect size to press the new bearings in. So I cut a section out of the old bearing race and used that to press the new ones in: Snap ring reinstalled: I also used the old cut bearing race to install the new seals: Axle hub getting pressed back into the housing: Both hubs finished, I headed home to reinstall. First loosely installing the upper camber bolt: Then slid the axle back in and reinstalled the ball joint. Ball joint housing bolt torqued to 36ft/lbs: Then tightened both main strut bolts to 130ft/lbs, making sure the camber marks lined up perfectly: Tie rod reinstalled and torqued to 19.9ft/lbs, with a new split pin installed. then sway bar link back on and tightened to 22ft/lbs: Axle nut back on hand tight, brake rotor and calliper reinstalled. Calliper bolts torqued to 57.9ft/lbs: Both left and right side to this stage. Then got my friend clampy to hold the brake pedal again, while I tightened the main axle nuts to 158ft/lbs. Then used a screw driver and rubber mallet to lock the axle nuts in place: Wheels back on and all done. I'll hopefully get the rear end hub bearings done in the next week or two.1 point
-
If I put a Garrett on a Subaru I would be pretty disappointed if I didn't end up with around 250kw as well. You see lots of Silvias with that kind of power because it's simple to swap the turbos out on them for proper ones. In the Subaru world 99% of people are fart-arsing about with stock location barbie-doll hairdriers which will maybe get you to 240wkw downhill with a tail wind. Long story short they don't mysteriously make more power than Subarus, for the most part a 2 litre 4-cylinder engine with the same compression ratio doesn't care about the arrangement of the cylinders, it's some pretty basic chemistry that results in power and the Datsuns aren't breaking the laws of thermodynamics any time soon.1 point
-
Yeah they have security cameras and they'll be pulling those up this week for the police. Probably won't help much in tracking down the car though1 point