Leaderboard

Popular Content
Showing content with the highest reputation on 14/10/17 in all areas
-
inspired by the people on club sub and reading the suby docs i figured DIY this weekend and share the notes before forgetting. mine is the face-lift 07 auto trans H6 3.0R with engine push start button. not all loom wiring is pre made for these model years. The purpose here is to complete the cruise control system by installing cruise buttons and parts to supply a brake switch signal to ECU pin B20. This is my write up, don’t do anything to stuff up your vehicle or anyone's safety and if you are not sure stop. steps are in sequence each dependent on the previous. 1. Have the correct service manual for your vehicle @ http://jdmfsm.info/Auto/Japan/Subaru/Legacy_Outback/ or https://techinfo.subaru.com. Print and read the relevant pages in the subaru service manual because there is important information and safety info in the 5,000+ page service manual that is not detailed here. 2. Most of these steps required the battery to be disconnected. 3. Check cruise and set lights are available on your dashboard, even if they are never lit. We only noticed ours when the sun was right behind us. 4. Check cruise is supported by the ECU. I used FreeSSM with a cheap vagcom cable and the engine diagnostics page shows integrated cruise control on the left hand side of the window. Not all models support cruise apparently higher spec models are more likely to 5. Check you have a 2 pin brake light switch and there is not a 4 pin loom plug tucked away in the loom near your brake light switch. if there is you are lucky and subaru have saved you a heap of time, just replace the switch with a 4 pin and ignore all of the new wiring steps. 6. Use the service manual to identify and check the ECU under the front passenger foot well carpet that ; 1. C25 (clutch pedal pin) is wired green yellow and tied 12v with ignition on (for auto transmission models), subaru included this wiring for us 2. note/ you could probably easily pick up the ignition 12v from elsewhere if you wanted to but i wanted to test C25 was working per the wiring diagram. 3. B20 (brake switch) is not wired. Subaru didn’t include this for us as they did for some previous model years. 7. Check which cruise controls are required. Similar legacy/outbacks to mine have steering wheel cruise control 8. Go to the wreckers and pick up; 1. Steering wheel cruise control buttons 2. 4 pin stop light & brake switch 3. 4 pin stop light & brake loom connector with some wiring 4. ECU plug with 5cm+ wires attached (computer under passenger footwell). This is so we can take a pin out to use on B20 9. not familiar with these components? practise removing ECU pins and also the connectors from the brake switch loom connector as this skills will be required later on. I didn't this before so asked for help @ https://mechanics.stackexchange.com/questions/48623/how-to-remove-pin-from-subaru-ecu-plug 10. Install steering wheel buttons which required removing the wheel to unscrew the buttons panels from the rear side. My SW buttons were stereo controls on the left and a blank plate on the right. Put it back together now the cruise dash light is shown during lamp test when the ignition is turned on. The set button on the steering wheel won’t do anything. May get a DTC whilst driving when the computer realises the other circuits are not ready. 11. now need to wire the normally closed contact on the 4 pin brake switch to feed ECU pin B20. I took the ignition power from C25 (spliced a couple inches back from the ECU plug) up behind the foot well, above the stereo and over to the brake switch location. The return came back along the same path to the ecu’s pin B20. This was time consuming because removed most of the front trim panels to follow existing loom paths. Used solder and heat shrink on all splices/joins and a PPS cable sleeve. Don’t work on ECU cables with their plugs connected to the brain. At first I couldn’t get the new ecu pin into B20 but gently did it to click in with the crimped side facing downward. 12. Replace 2 pin brake switch loom connector with the 4 pin. Used a small flat jewelers screwdriver to pop out the white/blue and brown/white wires from the new 4 pin loom connector as loom already had those. Popped out same colour wires from the 2 pin and moved them over to the four pin. Connected in the new cables from previous step. See pix above from @sobanoodle that yellow & green yellow wires are the new ones. Your green (or equivalent) goes from pin 1 on the connector to ECU B20 and your green/yellow from pin 4 on the connector to the ECU C25 splice. 13. Replace 2 pin brake switch with the 4 pin brake switch using a 12 mm spanner and check it is in the correct position. I used a multi meter to check the contacts changed state when the brake pedal was depressed even slightly (had to adjust the switch position, don't wanna be rear ended with no brake lights). It was good to test from the ECU side as well to check the new circuit is working end to end. 14. Put back enough of the panels and connectors to have the car driveable and test the engine starts with no warning lights. 15. didn’t do anything else to enable cruise because the computer detected all of the signals were in place. it automatically enabled and made the cruise available 16. go drive to test the new cruise control, it worked - the cruise function and dash lights operate nicely If I did this over would probably use another source of ignition 12V rather than have to splice the C25 wire. anyways done now and uses same circuit, fuses and pins described in the service manual for the factory cruise.7 points
-
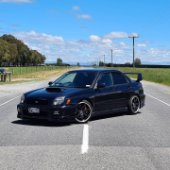
Dropped her another 15mm front could come down a little more I think. just rubbing issues5 points
-
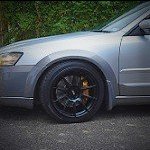
Thursday: removed v10 alloy arms, replaced with v7 sedan ones. No more clunks yay! And endlinks are now sitting right. Drives nice, only rattle now is from the loose bit of trim somewhere in the boot. Today Primered rims, painting em tomorrow. Mounted fire extinguisher. Replaced damaged led park light Took her for a bit of a drive, hopefully wof and clear coat rims Monday. Running out of time, but only little bits left now to be done.3 points
-
MSNZ rules are changing soon (april next year) anything above a clubsport basic event (motorkana/autocross) will require more than just cotton overalls, page 13/14 of schd A has the details just a heads up2 points
-
Partsouq.com2 points
-
Replace a F***ed gasket with a new one and gained ~3psi2 points
-
Problem solved. Took it into crowes and spoke with one of the guys their and he reckoned it was the gaskets where the pipes under the IC mount to the IC. So took it off, removed the gaskets and remade with gasket maker, thought I should check the bov at the same time.... lo and behold the bov gasket was F***ed. Now getting more vacuum, and higher boost. Was only boosting to (just under) 1bar (14psi) now pushing closer to 1.2 bar (17psi). Happy that it was a $14 fix rather than a new turbo....2 points
-
Hey guys, Whats the main genuine parts website? Its located in the UAE. I cant for the life of me remember the name and I have bought from them before. Cheers!1 point
-
This guy is seriously a good sort, before writing this diy he helped me out with info for this mod and even sent me a spare ecu plug so I had the pins FOR FREE!1 point
-
Maybe fine for a trackday depending on who's running it and what their rules are, but I don't think it will pass any MSNZ scrutineering.1 point
-
Have a good look under the intake manifold, your crossover pipe o-rings could be leaking a little like mine are.1 point
-
Lookin goood! When those rear brembos going on? Front is nice with the gold :-D1 point
-
Just keep driving it and checking it. Don't fill it up unless it is at or below the L mark and see what happens. If it keeps dropping below the L try bleeding it again. If the car is warm the level in the overflow will be higher and if the car is cold the level will be lower, just so you better understand what you are looking at.1 point
-
easy question for someone but i need to mount my hella horns and its in the way (the black hose thing)1 point
-
okay. My horns came with no wiring, ended up buying a harness from china for $9 and they over complicated it heaps for some reason but its wired up and works. Its pretty loud lol Time to terrorize the local dogs.1 point
-
Not power steering?1 point
-
I'm assuming for track day, I have a question. I have some 88% cotton / nylon blend overalls that's been impregnated with flame retardant, will they be fine?1 point
-
Could try Apparelmaster or similar commercial washing/renting businesses. Sure they must flick on old ones that aren’t up to scratch for someone paying for the service but still reasonable.1 point